

iOS UI Kit Sample App
Reference implementation of iOS UIKit, APNs and Push Notification Setup.
What this guide covers
- CometChat dashboard setup (enable push, add APNs Device + APNs VoIP providers) with screenshots.
- APNs + PushKit/CallKit wiring (tokens, delegates, CallKit).
- Incoming message/call handling and deep links.
- Payload customization and testing.
How APNs + CometChat work together
- APNs is the transport: Apple issues the APNs device/VoIP tokens and delivers the payloads. No FCM bridge is involved.
- CometChat providers: The APNs Device and APNs VoIP providers you add in the CometChat dashboard hold your APNs key/cert. When you call
CometChatNotifications.registerPushToken(..., .APNS_IOS_DEVICE / .APNS_IOS_VOIP, providerId)after login, CometChat binds those tokens to the logged-in user and sends to APNs for you. - Flow: Permission prompt → APNs returns device + VoIP tokens → after
CometChat.login, register both tokens with the matching provider IDs → CometChat sends to APNs → APNs delivers →UNUserNotificationCenterDelegate(andPushKit/CallKitfor VoIP) surface the notification/tap.
1. Enable push and add providers (CometChat Dashboard)
- Go to Notifications → Settings and enable Push Notifications.
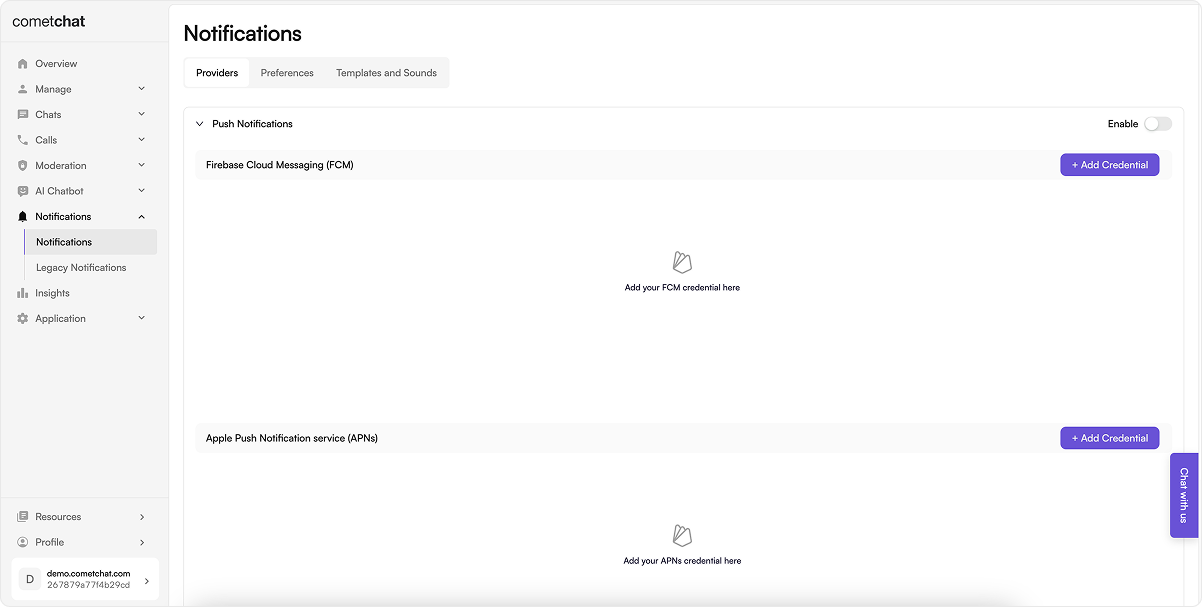
- Click Add Credentials:
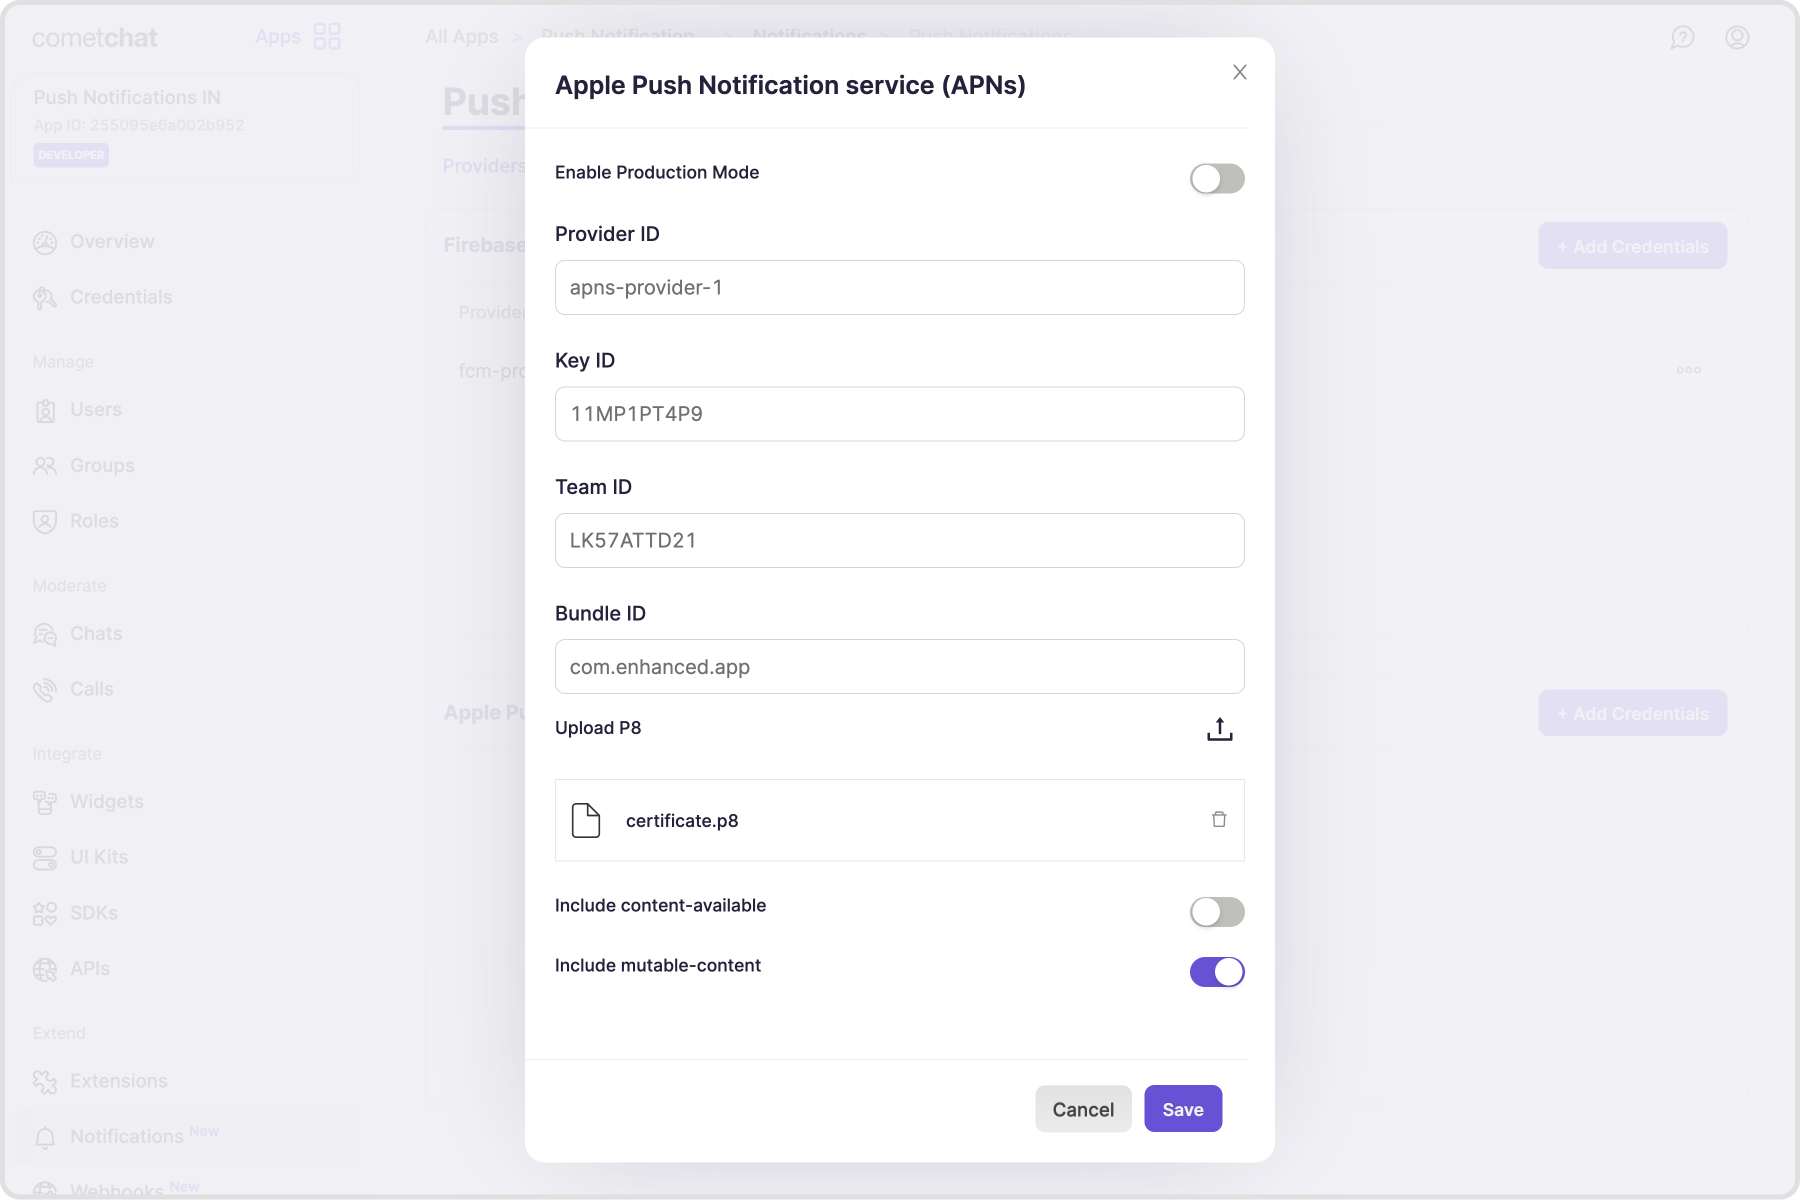
- Add an APNs Device provider (alerts) using your
.p8key, Team ID, Key ID, and Bundle ID; copy the Provider ID. - Add an APNs VoIP provider (calls) with the same
.p8(recommended for CallKit reliability); copy the Provider ID.
- Add an APNs Device provider (alerts) using your
2. Apple setup
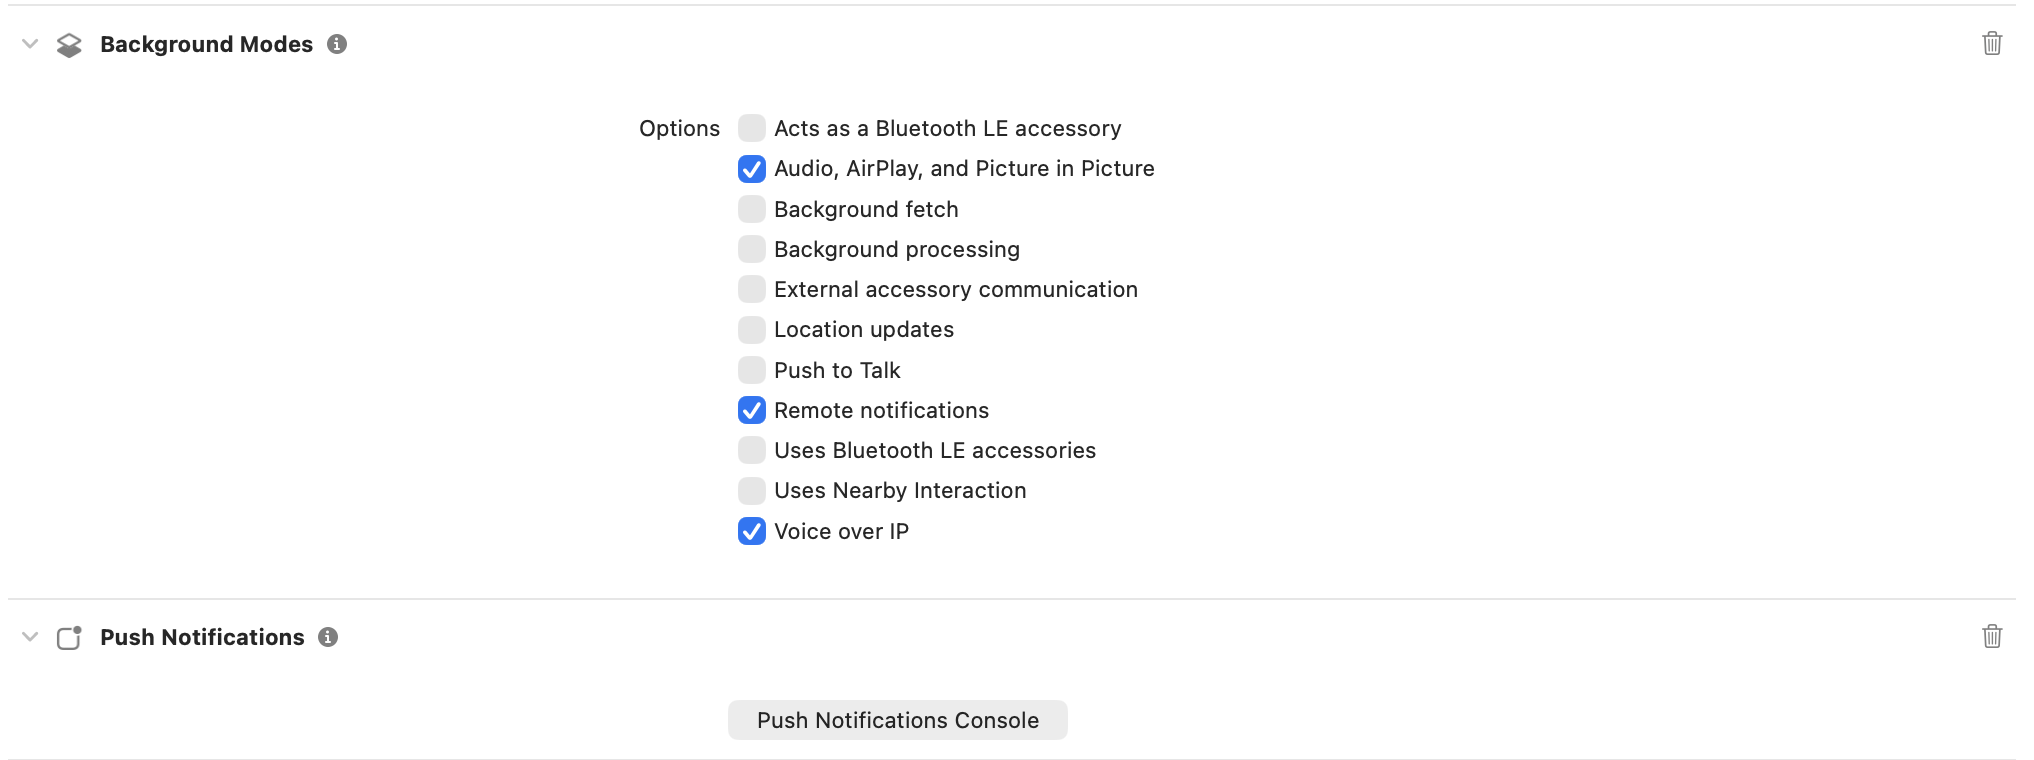
- Capabilities: Push Notifications, Background Modes → Remote notifications & Voice over IP, CallKit usage descriptions in
Info.plist(mic/camera). - APNs Auth Key: generate
.p8(or use cert), note Key ID, Team ID, and Bundle ID; upload to CometChat providers.
3. Wiring APNs + PushKit/CallKit
- From below code, copy
CometChatAPNsHelper.swift,CometChatPNHelper.swift, and the twoAppDelegateextensions (AppDelegate+PN.swiftandAppDelegate+VoIP.swift) into your project. - These files implement APNs + PushKit/CallKit handling, notification presentation, tap and quick-reply actions, and call management.
- Update bundle ID, team ID, and provider IDs (
AppConstants.PROVIDER_IDetc.). Keep thevoippush type.
- AppDelegate + PN.swift
- AppDelegate + VoIP.swift
- CometChatAPNsHelper.swift
- CometChatPNHelper.swift
- AppConstants.swift
import Foundation
import UIKit
import CometChatSDK
import CometChatUIKitSwift

extension AppDelegate: UNUserNotificationCenterDelegate {

    // MARK: - Foreground Notifications
    func userNotificationCenter(_ center: UNUserNotificationCenter, willPresent notification: UNNotification, withCompletionHandler completionHandler: @escaping (UNNotificationPresentationOptions) -> Void) {
        print("willPresent notification: \(notification.request.content.userInfo)")
        let userInfo = notification.request.content.userInfo

        if CometChatPNHelper.shouldPresentNotification(userInfo: userInfo) == false {
            print("Suppressing notification (user is in active chat)")
            completionHandler([])
            return
        }

        completionHandler([.banner, .badge, .sound])
    }

    // MARK: - Notification Tap/Interaction
    func userNotificationCenter(_ center: UNUserNotificationCenter, didReceive response: UNNotificationResponse, withCompletionHandler completionHandler: @escaping () -> Void) {

        let userInfo = response.notification.request.content.userInfo
        print("User tapped notification: \(userInfo)")

        if response.actionIdentifier == "REPLY_ACTION" {
            if let textResponse = response as? UNTextInputNotificationResponse {
                let userReply = textResponse.userText
                print("Quick reply: \(userReply)")
                CometChatPNHelper.handleQuickReplyActionOnNotification(userInfo: userInfo, text: userReply, completionHandler: completionHandler)
            }
            completionHandler()
            return
        }

        CometChatPNHelper.handleTapActionOnNotification(userInfo: userInfo, completionHandler: completionHandler)
    }
}
#if canImport(CometChatCallsSDK)

import Foundation
import PushKit
import CallKit
import AVFoundation
import CometChatSDK
import CometChatCallsSDK

extension AppDelegate: PKPushRegistryDelegate, CXProviderDelegate {

  // MARK: - VoIP Push Token Updates

  func pushRegistry(
      _ registry: PKPushRegistry,
      didUpdate pushCredentials: PKPushCredentials,
      for type: PKPushType
  ) {
      print("VoIP token updated for type: \(type.rawValue)")
      cometchatAPNsHelper.registerForVoIPCalls(pushCredentials: pushCredentials)
  }

  func pushRegistry(
      _ registry: PKPushRegistry,
      didInvalidatePushTokenFor type: PKPushType
  ) {
      print("VoIP push token invalidated for type: \(type.rawValue)")
      initializePushKit()
      refreshPushCredentials()
  }

  // MARK: - PushKit Setup

  func initializePushKit() {
      if pushRegistry == nil {
          let registry = PKPushRegistry(queue: DispatchQueue.main)
          registry.delegate = self
          registry.desiredPushTypes = [.voIP]
          pushRegistry = registry
          print("Push registry initialized")
      } else {
          print("Push registry already initialized")
      }
  }

  func refreshPushCredentials() {
      guard let registry = pushRegistry else {
          print("Push registry is nil")
          return
      }

      registry.desiredPushTypes = []
      registry.desiredPushTypes = [.voIP]
      print("VoIP token refreshed")
  }

  // MARK: - Incoming VoIP Push

  func pushRegistry(
      _ registry: PKPushRegistry,
      didReceiveIncomingPushWith payload: PKPushPayload,
      for type: PKPushType,
      completion: @escaping () -> Void
  ) {
      print("Incoming VoIP push received")
      let provider = cometchatAPNsHelper.didReceiveIncomingPushWith(payload: payload)
      provider?.setDelegate(self, queue: nil)
      completion()
  }

  // MARK: - CallKit Delegates

  func providerDidReset(_ provider: CXProvider) {
      print("CallKit provider did reset")
      cometchatAPNsHelper.onProviderDidReset(provider: provider)
  }

  func provider(_ provider: CXProvider, perform action: CXAnswerCallAction) {
      print("User answered call")

      // CRITICAL: Configure audio session BEFORE answering
      configureAudioSession()

      cometchatAPNsHelper.onAnswerCallAction(action: action)
  }

  func provider(_ provider: CXProvider, perform action: CXEndCallAction) {
      print("User ended call")
      cometchatAPNsHelper.onEndCallAction(action: action)
      action.fulfill()
  }

  func provider(_ provider: CXProvider, perform action: CXSetMutedCallAction) {
      print("User toggled mute: \(action.isMuted)")
      CometChatCalls.audioMuted(action.isMuted)
      action.fulfill()
  }

  // MARK: - CRITICAL: Audio Session Delegates (MISSING IN YOUR CODE)

  /// Called when CallKit activates the audio session
  func provider(_ provider: CXProvider, didActivate audioSession: AVAudioSession) {
      print("Audio session activated")

      // Configure audio session for VoIP
      configureAudioSession()

      // Removed CometChatCalls.startAudioSession() as per instructions
  }

  /// Called when CallKit deactivates the audio session
  func provider(_ provider: CXProvider, didDeactivate audioSession: AVAudioSession) {
      print("Audio session deactivated")

      // Removed CometChatCalls.stopAudioSession() as per instructions
  }

  // MARK: - Audio Session Configuration

  /// Configure AVAudioSession for VoIP calls
  private func configureAudioSession() {
      let audioSession = AVAudioSession.sharedInstance()

      do {
          // Set category for VoIP with speaker and bluetooth support
          try audioSession.setCategory(
              .playAndRecord,
              mode: .voiceChat,
              options: [.allowBluetooth, .allowBluetoothA2DP]
          )

          // Activate the session
          try audioSession.setActive(true)

          print("Audio session configured successfully")

      } catch {
          print("Failed to configure audio session: \(error.localizedDescription)")
      }
  }
}

#endif
import Foundation
import UIKit
import CometChatSDK
import CometChatUIKitSwift
import PushKit
import CallKit
import AVFAudio
#if canImport(CometChatCallsSDK)
import CometChatCallsSDK
#endif
class CometChatAPNsHelper {
var uuid: UUID?
var activeCall: Call?
var cancelCall: Bool = true
var onCall = true
var callController = CXCallController()
let voipRegistry = PKPushRegistry(queue: DispatchQueue.main)
var provider: CXProvider? = nil
// MARK: - Configure Push Notifications
public func configurePushNotification(application: UIApplication, delegate: AppDelegate) {
print("Configuring Push Notifications...")
let authOptions: UNAuthorizationOptions = [.alert, .badge, .sound]
UNUserNotificationCenter.current().requestAuthorization(
options: authOptions,
completionHandler: { granted, error in
print("Push notification authorization granted: \(granted)")
if let error = error {
print("Authorization error: \(error.localizedDescription)")
} else if granted {
print("User granted notification permissions")
// Register for remote notifications on main thread
DispatchQueue.main.async {
UIApplication.shared.registerForRemoteNotifications()
}
} else {
print("User denied notification permissions")
}
})
// Define the reply action
let replyAction = UNTextInputNotificationAction(
identifier: "REPLY_ACTION",
title: "Reply",
options: [],
textInputButtonTitle: "Send",
textInputPlaceholder: "Type your reply here"
)
// Define the notification category
let messageCategory = UNNotificationCategory(
identifier: "MESSAGE_CATEGORY",
actions: [replyAction],
intentIdentifiers: [],
options: []
)
// Register the category
UNUserNotificationCenter.current().setNotificationCategories([messageCategory])
// Add login listener
CometChat.addLoginListener("loginlistener-pnToken-register-login", self)
#if canImport(CometChatCallsSDK)
let voipRegistry: PKPushRegistry = PKPushRegistry(queue: DispatchQueue.main)
voipRegistry.delegate = (delegate as? PKPushRegistryDelegate)
voipRegistry.desiredPushTypes = [PKPushType.voIP]
CometChatCallEvents.addListener("loginlistener-pnToken-register-login", self)
#endif
}
// MARK: - Register APNs Token
public func registerTokenForPushNotification(deviceToken: Data) {
guard CometChat.getLoggedInUser() != nil else {
print("Cannot register token: User not logged in")
return
}
let hexString = deviceToken.map { String(format: "%02.2hhx", $0) }.joined()
UserDefaults.standard.set(hexString, forKey: "apnspuToken")
print("APNs token: \(hexString)")
CometChatNotifications.registerPushToken(
pushToken: hexString,
platform: CometChatNotifications.PushPlatforms.APNS_IOS_DEVICE,
providerId: AppConstants.PROVIDER_ID,
onSuccess: { success in
print("APNs token registered successfully: \(success)")
},
onError: { error in
print("APNs token registration failed: \(error.errorCode) - \(error.errorDescription)")
}
)
}
// MARK: - Register Pending Token (After Login)
private func registerPendingTokenIfNeeded() {
if let pendingToken = UserDefaults.standard.string(forKey: "pendingAPNsToken") {
print("Registering pending APNs token after login...")
if let tokenData = hexStringToData(pendingToken) {
registerTokenForPushNotification(deviceToken: tokenData)
UserDefaults.standard.removeObject(forKey: "pendingAPNsToken")
}
}
}
private func hexStringToData(_ string: String) -> Data? {
let len = string.count / 2
var data = Data(capacity: len)
for i in 0..<len {
let j = string.index(string.startIndex, offsetBy: i*2)
let k = string.index(j, offsetBy: 2)
let bytes = string[j..<k]
if var num = UInt8(bytes, radix: 16) {
data.append(&num, count: 1)
} else {
return nil
}
}
return data
}
// MARK: - VoIP Registration
public func registerForVoIPCalls(pushCredentials: PKPushCredentials) {
guard CometChat.getLoggedInUser() != nil else {
print("Cannot register VoIP token: User not logged in")
return
}
let deviceToken = pushCredentials.token.reduce("", {$0 + String(format: "%02X", $1) })
UserDefaults.standard.set(deviceToken, forKey: "voipToken")
print("VoIP token: \(deviceToken)")
CometChatNotifications.registerPushToken(
pushToken: deviceToken,
platform: CometChatNotifications.PushPlatforms.APNS_IOS_VOIP,
providerId: AppConstants.PROVIDER_ID,
onSuccess: { success in
print("VoIP token registered successfully: \(success)")
},
onError: { error in
print("VoIP token registration failed: \(error.errorCode) - \(error.errorDescription)")
}
)
}
// MARK: - Missed Call Notification
public func handleMissedCallNotification(payload: [AnyHashable: Any]) {
guard let senderName = payload["senderName"] as? String,
let senderAvatar = payload["senderAvatar"] as? String else {
print("Missing required payload fields for missed call")
return
}
let content = UNMutableNotificationContent()
if let avatarURL = URL(string: senderAvatar), let imageData = try? Data(contentsOf: avatarURL) {
do {
let fileManager = FileManager.default
let temporaryDirectory = URL(fileURLWithPath: NSTemporaryDirectory())
let fileURL = temporaryDirectory.appendingPathComponent("avatar.png")
try imageData.write(to: fileURL)
let attachment = try UNNotificationAttachment(identifier: "avatar", url: fileURL, options: nil)
content.attachments = [attachment]
} catch {
print("Error creating notification attachment: \(error.localizedDescription)")
}
}
content.title = "\(senderName)"
content.body = "Missed call"
content.sound = UNNotificationSound.default
let request = UNNotificationRequest(identifier: UUID().uuidString, content: content, trigger: nil)
UNUserNotificationCenter.current().add(request) { error in
if let error = error {
print("Error displaying missed call notification: \(error.localizedDescription)")
} else {
print("Missed call notification displayed")
}
}
}
func reloadViewController(_ rootViewController : UIViewController) {
if let navigationController = rootViewController as? UINavigationController {
if let visibleViewController = navigationController.visibleViewController {
visibleViewController.viewWillAppear(true)
visibleViewController.viewDidAppear(true)
}
} else {
rootViewController.viewWillAppear(true)
rootViewController.viewDidAppear(true)
}
}
// MARK: - Present Message From Payload
public func presentMessageFromPayload(response: UNNotificationResponse) {
let notification = response.notification.request.content.userInfo as? [String: Any]
if let userInfo = notification, let messageObject =
userInfo["message"], let dict = messageObject as? [String: Any] {
let message = CometChat.processMessage(dict).0
let cometChatMessages = MessagesVC()
if message?.receiverType == .user {
guard let uid = message?.senderUid, let userName = message?.sender?.name else { return }
let user = User(uid: uid, name: userName)
cometChatMessages.user = user
} else {
guard let group = (message?.receiver as? Group) else { return }
cometChatMessages.group = group
}
cometChatMessages.modalPresentationStyle = .fullScreen
let sceneDelegate = UIApplication.shared.connectedScenes.first?.delegate as? SceneDelegate
if let window = sceneDelegate?.window, let rootViewController = window.rootViewController {
var currentController = rootViewController
while let presentedController = currentController.presentedViewController {
currentController = presentedController
}
currentController.present(cometChatMessages, animated: true)
}
}
}
}
// MARK: - Login Token Handling
extension CometChatAPNsHelper: CometChatLoginDelegate {
func onLoginSuccess(user: CometChatSDK.User) {
print("User logged in successfully: \(user.uid ?? "unknown")")
// Register for APNs after login
DispatchQueue.main.async {
UIApplication.shared.registerForRemoteNotifications()
print("Requesting APNs token after login...")
}
// Check for pending token
registerPendingTokenIfNeeded()
#if canImport(CometChatCallsSDK)
DispatchQueue.main.asyncAfter(deadline: .now() + 2) {
if let appDelegate = UIApplication.shared.delegate as? AppDelegate {
let registry = PKPushRegistry(queue: DispatchQueue.main)
registry.delegate = appDelegate
appDelegate.pushRegistry(registry, didInvalidatePushTokenFor: .voIP)
}
}
#endif
}
func onLoginFailed(error: CometChatSDK.CometChatException?) {
print("Login failed: \(error?.errorDescription ?? "unknown error")")
}
func onLogoutSuccess() {
print("User logged out successfully")
}
func onLogoutFailed(error: CometChatSDK.CometChatException?) {
print("Logout failed: \(error?.errorDescription ?? "unknown error")")
}
}
// MARK: - VoIP & CallKit Functions
#if canImport(CometChatCallsSDK)
extension CometChatAPNsHelper {
public func didReceiveIncomingPushWith(payload: PKPushPayload) -> CXProvider? {
guard let sender = payload.dictionaryPayload["sender"] as? String,
let senderName = payload.dictionaryPayload["senderName"] as? String,
let body = payload.dictionaryPayload["body"] as? String,
let callAction = payload.dictionaryPayload["callAction"] as? String,
let receiver = payload.dictionaryPayload["receiver"] as? String,
let type = payload.dictionaryPayload["type"] as? String,
let callType = payload.dictionaryPayload["callType"] as? String,
let sessionId = payload.dictionaryPayload["sessionId"] as? String,
let conversationId = payload.dictionaryPayload["conversationId"] as? String else {
print("Incomplete VoIP payload")
return nil
}
let applicationState = UIApplication.shared.applicationState
print("VoIP push received - Action: \(callAction), State: \(applicationState.rawValue)")
if type == "call" {
switch callAction {
case "initiated":
switch applicationState {
case .active:
if CometChat.getActiveCall() != nil {
print("User already on a call, rejecting with busy...")
CometChat.rejectCall(sessionID: sessionId, status: .busy, onSuccess: { rejectedCall in
print("Rejected incoming call with busy status")
}, onError: { error in
print("Failed to reject with busy: \(error?.errorDescription ?? "")")
})
return nil
} else {
return updatedInitiateCall(sender: sender, senderName: senderName, body: body, callAction: callAction, receiver: receiver, callType: callType, sessionId: sessionId, conversationId: conversationId)
}
case .inactive, .background:
return updatedInitiateCall(sender: sender, senderName: senderName, body: body, callAction: callAction, receiver: receiver, callType: callType, sessionId: sessionId, conversationId: conversationId)
@unknown default:
break
}
case "ongoing":
print("Call ongoing")
break
case "unanswered":
provider?.reportCall(with: uuid!, endedAt: Date(), reason: .unanswered)
handleMissedCallNotification(payload: payload.dictionaryPayload)
case "rejected":
provider?.reportCall(with: uuid!, endedAt: Date(), reason: .unanswered)
case "busy":
if let uuid = uuid {
provider?.reportCall(with: uuid, endedAt: Date(), reason: .unanswered)
self.uuid = nil
}
case "cancelled":
provider?.reportCall(with: uuid!, endedAt: Date(), reason: .failed)
handleMissedCallNotification(payload: payload.dictionaryPayload)
case "ended":
provider?.reportCall(with: uuid!, endedAt: Date(), reason: .remoteEnded)
default:
provider?.reportCall(with: uuid!, endedAt: Date(), reason: .remoteEnded)
}
}
return nil
}
public func onAnswerCallAction(action: CXAnswerCallAction) {
if activeCall != nil {
startCall()
}
action.fulfill()
}
private func updatedInitiateCall(sender: String, senderName: String, body: String, callAction: String, receiver: String, callType: String, sessionId: String, conversationId: String) -> CXProvider? {
let callTypeValue: CometChat.CallType = callType == "audio" ? .audio : .video
let receiverType: CometChat.ReceiverType = conversationId.contains("group") ? .group : .user
let call = Call(receiverId: receiver, callType: callTypeValue, receiverType: receiverType)
call.sessionID = sessionId
call.callStatus = .initiated
call.initiatedAt = Date().timeIntervalSince1970
call.callInitiator = User(uid: sender, name: senderName)
call.callType = callTypeValue
call.callReceiver = User(uid: receiver, name: receiver)
activeCall = call
uuid = UUID()
let callerName = senderName
let config = CXProviderConfiguration(localizedName: "APNS + Callkit")
config.iconTemplateImageData = UIImage(named: "AppIcon")?.pngData()
config.includesCallsInRecents = true
config.ringtoneSound = "ringtone.caf"
config.supportsVideo = true
provider = CXProvider(configuration: config)
let update = CXCallUpdate()
update.remoteHandle = CXHandle(type: .generic, value: callerName.capitalized)
update.hasVideo = callType == "video"
provider?.reportNewIncomingCall(with: uuid!, update: update, completion: { error in
if error == nil {
self.configureAudioSession()
}
})
return provider!
}
private func configureAudioSession() {
do {
try AVAudioSession.sharedInstance().setCategory(AVAudioSession.Category.playAndRecord, options: [.mixWithOthers, .allowBluetooth, .defaultToSpeaker])
try AVAudioSession.sharedInstance().setActive(true)
} catch let error as NSError {
print("Audio session error: \(error)")
}
}
private func startCall() {
let cometChatOngoingCall = CometChatOngoingCall()
CometChat.acceptCall(sessionID: activeCall?.sessionID ?? "") { call in
DispatchQueue.main.async {
let isAudioCall = (self.activeCall?.callType == .audio)
var callSettingsBuilder = CometChatCallsSDK.CallSettingsBuilder()
callSettingsBuilder = callSettingsBuilder.setIsAudioOnly(isAudioCall)
cometChatOngoingCall.set(callSettingsBuilder: callSettingsBuilder)
cometChatOngoingCall.set(callWorkFlow: .defaultCalling)
cometChatOngoingCall.set(sessionId: call?.sessionID ?? "")
cometChatOngoingCall.modalPresentationStyle = .fullScreen
if let sceneDelegate = UIApplication.shared.connectedScenes.first?.delegate as? SceneDelegate,
let window = sceneDelegate.window,
let rootViewController = window.rootViewController {
var currentController = rootViewController
while let presentedController = currentController.presentedViewController {
currentController = presentedController
}
currentController.present(cometChatOngoingCall, animated: true)
}
}
cometChatOngoingCall.setOnCallEnded { [weak self] call in
DispatchQueue.main.async {
if let scene = UIApplication.shared.connectedScenes.first(where: { $0.activationState == .foregroundActive }) as? UIWindowScene {
if let rootViewController = scene.windows.first?.rootViewController {
self?.dismissCometChatIncomingCall(from: rootViewController)
self?.reloadViewController(rootViewController)
}
}
}
self?.provider?.reportCall(with: self?.uuid ?? UUID(), endedAt: Date(), reason: .remoteEnded)
}
} onError: { error in
print("Error accepting call: \(error?.errorDescription ?? "")")
}
}
func onCallEnded(call: CometChatSDK.Call) {
guard let uuid = uuid else { return }
if activeCall != nil {
let transaction = CXTransaction(action: CXEndCallAction(call: uuid))
callController.request(transaction, completion: { error in })
activeCall = nil
}
DispatchQueue.main.sync { [self] in
if let scene = UIApplication.shared.connectedScenes.first(where: { $0.activationState == .foregroundActive }) as? UIWindowScene {
if let rootViewController = scene.windows.first?.rootViewController {
dismissCometChatIncomingCall(from: rootViewController)
self.reloadViewController(rootViewController)
}
}
}
}
func onCallInitiated(call: CometChatSDK.Call) {
let callerName = (call.callReceiver as? User)?.name
callController = CXCallController()
uuid = UUID()
let transactionCallStart = CXTransaction(action: CXStartCallAction(call: uuid!, handle: CXHandle(type: .generic, value: callerName ?? "")))
callController.request(transactionCallStart, completion: { error in })
}
private func dismissCometChatIncomingCall(from viewController: UIViewController) {
if let presentedViewController = viewController.presentedViewController {
if presentedViewController is CometChatIncomingCall {
presentedViewController.dismiss(animated: false, completion: nil)
} else {
dismissCometChatIncomingCall(from: presentedViewController)
}
}
}
public func onProviderDidReset(provider: CXProvider) {
if let uuid = self.uuid {
onCall = true
provider.reportCall(with: uuid, endedAt: Date(), reason: .unanswered)
}
}
public func onEndCallAction(action: CXEndCallAction) {
let endCallAction = CXEndCallAction(call: uuid!)
let transaction = CXTransaction()
transaction.addAction(endCallAction)
callController.request(transaction) { error in
if let error = error {
print("Error requesting transaction: \(error)")
} else {
print("Requested transaction successfully")
}
}
if let activeCall = activeCall {
if CometChat.getActiveCall() == nil || (CometChat.getActiveCall()?.callStatus == .initiated && CometChat.getActiveCall()?.callInitiator != CometChat.getLoggedInUser()) {
CometChat.rejectCall(sessionID: activeCall.sessionID ?? "", status: .rejected, onSuccess: { [self] (rejectedCall) in
action.fulfill()
print("CallKit: Reject call success")
DispatchQueue.main.async { [self] in
if let scene = UIApplication.shared.connectedScenes.first(where: { $0.activationState == .foregroundActive }) as? UIWindowScene {
if let rootViewController = scene.windows.first?.rootViewController {
self.dismissCometChatIncomingCall(from: rootViewController)
self.reloadViewController(rootViewController)
}
}
if let uuid = uuid {
provider?.reportCall(with: uuid, endedAt: Date(), reason: .remoteEnded)
self.uuid = nil
}
}
}) { (error) in
print("CallKit: Reject call failed: \(error?.errorDescription ?? "")")
}
} else {
CometChat.endCall(sessionID: CometChat.getActiveCall()?.sessionID ?? "") { call in
CometChatCalls.endSession()
action.fulfill()
print("CallKit: End call success")
DispatchQueue.main.async { [self] in
if let scene = UIApplication.shared.connectedScenes.first(where: { $0.activationState == .foregroundActive }) as? UIWindowScene {
if let rootViewController = scene.windows.first?.rootViewController {
self.dismissCometChatIncomingCall(from: rootViewController)
self.reloadViewController(rootViewController)
}
}
}
} onError: { error in
print("CallKit: End call failed: \(error?.errorDescription ?? "")")
}
}
}
}
}
extension CometChatAPNsHelper: CometChatCallEventListener {
func ccCallEnded(call: Call) {
guard let uuid = uuid else { return }
if activeCall != nil {
let transactionCallAccepted = CXTransaction(action: CXEndCallAction(call: uuid))
callController.request(transactionCallAccepted, completion: { error in })
activeCall = nil
}
}
}
#endif
import Foundation
import UIKit
import CometChatSDK
import CometChatUIKitSwift

class CometChatPNHelper {

let cometchatAPNsHelper = CometChatAPNsHelper()
static var currentActiveUser: CometChatSDK.User?
static var currentActiveGroup: CometChatSDK.Group?

static func handleTapActionOnNotification(userInfo: [AnyHashable: Any], completionHandler: @escaping () -> Void) {
  guard let notificationType = userInfo["type"] as? String,
     let receiverType = userInfo["receiverType"] as? String else {
    print("Notification type or receiver type not found in payload")
    completionHandler()
    return
  }

  switch notificationType {
  case "chat":
    if receiverType == "user" {
      handleChatNotification(userInfo: userInfo)
    } else if receiverType == "group" {
      handleGroupChatNotification(userInfo: userInfo)
    } else {
      print("Invalid receiver type for chat notification")
    }

  case "call":
    if receiverType == "user" {
      handleChatNotification(userInfo: userInfo)
    } else if receiverType == "group" {
      handleGroupChatNotification(userInfo: userInfo)
    } else {
      print("Invalid receiver type for call notification")
    }

  default:
    navigateToDefaultScreen()
  }

  completionHandler()
}

static func handleQuickReplyActionOnNotification(userInfo: [AnyHashable: Any], text: String, completionHandler: @escaping () -> Void) {
  guard let notificationType = userInfo["type"] as? String,
     let receiverType = userInfo["receiverType"] as? String else {
    print("Notification type or receiver type not found in payload")
    completionHandler()
    return
  }

  switch notificationType {
  case "chat":
    if receiverType == "user" {
      replyToUserWith(message: text, userInfo: userInfo)
    } else if receiverType == "group" {
      replyToGroupWith(message: text, userInfo: userInfo)
    } else {
      print("Invalid receiver type for chat notification")
    }
  default:
    break
  }

  completionHandler()
}

static func navigateToViewController(_ viewController: UIViewController) {

  guard let window = UIApplication.shared.windows.first else {
    print("Window not found")
    return
  }

  if let navigationController = window.rootViewController as? UINavigationController {
    if let currentViewController = navigationController.viewControllers.last,
      currentViewController.description == viewController.description {
      print("Already in same view")
      return

    }
    navigationController.popViewController(animated: false)
    navigationController.pushViewController(viewController, animated: false)
  } else {
    print("Root view controller is not a UINavigationController")
  }

}

static func replyToUserWith(message text: String, userInfo: [AnyHashable: Any], withParentId: Int? = nil) {
  guard let sender = userInfo["sender"] as? String,
     let senderName = userInfo["senderName"] as? String else {
    print("Sender information missing in payload")
    return
  }

  let textMessage = TextMessage(receiverUid: sender, text: text, receiverType: .user)
  if let parentID = withParentId {
    textMessage.parentMessageId = parentID
  }
  CometChatUIKit.sendTextMessage(message: textMessage)
}

static func replyToGroupWith(message text: String, userInfo: [AnyHashable: Any], withParentId: Int? = nil) {
  guard let groupID = userInfo["receiver"] as? String,
     let groupName = userInfo["receiverName"] as? String else {
    print("Group information missing in payload")
    return
  }

  let textMessage = TextMessage(receiverUid: groupID, text: text, receiverType: .group)
  if let parentID = withParentId {
    textMessage.parentMessageId = parentID
  }
  CometChatUIKit.sendTextMessage(message: textMessage)
}

static func handleChatNotification(userInfo: [AnyHashable: Any]) {
  guard let sender = userInfo["sender"] as? String,
     let senderName = userInfo["senderName"] as? String else {
    print("Sender information missing in payload")
    return
  }

  let senderUser = User(uid: sender, name: senderName)
  senderUser.avatar = userInfo["senderAvatar"] as? String

  getUser(forUID: sender) { retrievedUser in
    DispatchQueue.main.async {
      if let user = retrievedUser {
        senderUser.status = user.status
      } else {
        print("Failed to retrieve user status")
      }

      let chatViewController = MessagesVC()
      chatViewController.user = retrievedUser
      self.navigateToViewController(chatViewController)
    }

  }
}


static func handleGroupChatNotification(userInfo: [AnyHashable: Any]) {
  guard let groupID = userInfo["receiver"] as? String,
     let groupName = userInfo["receiverName"] as? String else {
    print("Group information missing in payload")
    return
  }

  let groupUser = Group(guid: groupID, name: groupName, groupType: .private, password: nil)

  self.getGroup(for: groupUser, guid: groupID) { fetchedGroup in
    DispatchQueue.main.async {
      if let group = fetchedGroup {
        groupUser.membersCount = group.membersCount
        groupUser.icon = group.icon
      } else {
        print("Failed to fetch group members count")
      }
      let chatViewController = MessagesVC()
      chatViewController.group = fetchedGroup
      self.navigateToViewController(chatViewController)
    }
  }
}

static func handleCallNotification(userInfo: [AnyHashable: Any]) {
  guard let sender = userInfo["sender"] as? String,
     let senderName = userInfo["senderName"] as? String else {
    print("Sender information missing in payload")
    return
  }

  let user = User(uid: sender, name: senderName)
  user.avatar = userInfo["senderAvatar"] as? String
  DispatchQueue.main.async {
    let callViewController = MessagesVC()
    callViewController.user = user
    CometChatPNHelper.navigateToViewController(callViewController)
  }
}

static func handleGroupCallNotification(userInfo: [AnyHashable: Any]) {
  guard let groupID = userInfo["receiver"] as? String,
     let groupName = userInfo["receiverName"] as? String else {
    print("Group information missing in payload")
    return
  }

  let groupUser = Group(guid: groupID, name: groupName, groupType: .private, password: nil)
  groupUser.icon = userInfo["receiverAvatar"] as? String
  DispatchQueue.main.async {

    let callViewController = MessagesVC()
    callViewController.group = groupUser
    CometChatPNHelper.navigateToViewController(callViewController)
  }
}

static func navigateToDefaultScreen() {
  DispatchQueue.main.async {
    let defaultViewController = MessagesVC()

    guard let window = UIApplication.shared.windows.first else {
      print("Window not found")
      return
    }

    if let navigationController = window.rootViewController as? UINavigationController {
      navigationController.pushViewController(defaultViewController, animated: true)
    } else {
      print("Root view controller is not a UINavigationController")
    }
  }
}
static func getUser(forUID uid: String, completionHandler: @escaping (CometChatSDK.User?) -> Void) {
  CometChat.getUser(UID: uid, onSuccess: { user in
    let user = user
    completionHandler(user)
  }) { error in
    print("User fetching failed with error: \(error?.errorDescription ?? "Unknown error")")
    completionHandler(nil)
  }
}

static func getGroup(for group: Group, guid: String, completionHandler: @escaping (Group?) -> Void) {
  CometChat.getGroup(GUID: guid, onSuccess: { fetchedGroup in
    completionHandler(fetchedGroup)
  }) { error in
    print("Group details fetching failed with error: \(error?.errorDescription ?? "Unknown error")")
    completionHandler(nil)
  }
}

static func shouldPresentNotification(userInfo: [AnyHashable: Any]) -> Bool {
  guard let notificationType = userInfo["type"] as? String,
     let receiverType = userInfo["receiverType"] as? String else {
    return true
  }

  if notificationType == "chat" {
    if receiverType == "user" {
      let sender = userInfo["sender"] as? String
      if sender == CometChatPNHelper.currentActiveUser?.uid {
        return false
      }
    } else if receiverType == "group" {
      let receiver = userInfo["receiver"] as? String
      if receiver == CometChatPNHelper.currentActiveGroup?.guid {
        return false
      }
    }
  }

  return true
}
}
import Foundation
import UIKit

class AppConstants {
    static var APP_ID: String = ""
    static var AUTH_KEY: String = ""
    static var REGION: String = ""
    static var PROVIDER_ID: String = ""
}

extension AppConstants{
    static func saveAppConstants(){
        UserDefaults.standard.set(APP_ID, forKey: "appID")
        UserDefaults.standard.set(AUTH_KEY, forKey: "authKey")
        UserDefaults.standard.set(REGION, forKey: "region")
    }

    static func retrieveAppConstants(){
        APP_ID = UserDefaults.standard.string(forKey: "appID") ?? AppConstants.APP_ID
        AUTH_KEY = UserDefaults.standard.string(forKey: "authKey") ?? AppConstants.AUTH_KEY
        REGION = UserDefaults.standard.string(forKey: "region") ?? AppConstants.REGION
    }
}
4. Register APNs device + VoIP tokens with CometChat
- In your
AppDelegate.swift, implement the following methods to handle APNs registration success and failure, and to register the device token with CometChat. - Make sure to import the necessary modules at the top of the file.
- Complete your
AppDelegate.swiftas shown below:
import UIKit
import PushKit
import CometChatSDK
import CometChatUIKitSwift

@main
class AppDelegate: UIResponder, UIApplicationDelegate {

    var window: UIWindow?
    var pushRegistry: PKPushRegistry?
    let cometchatAPNsHelper = CometChatAPNsHelper()
    func application(
        _ application: UIApplication,
        didFinishLaunchingWithOptions launchOptions: [UIApplication.LaunchOptionsKey: Any]?
    ) -> Bool {

        UNUserNotificationCenter.current().delegate = self

        cometchatAPNsHelper.configurePushNotification(application: application, delegate: self)

        // Initialize PushKit
        initializePushKit()

        return true
    }

    // MARK: - APNs Registration Success
    func application(_ application: UIApplication, didRegisterForRemoteNotificationsWithDeviceToken deviceToken: Data) {
        print("APNs Device token received!")

        if CometChat.getLoggedInUser() != nil {
            print("User is logged in, registering APNs token...")
            cometchatAPNsHelper.registerTokenForPushNotification(deviceToken: deviceToken)
        } else {
            print("User NOT logged in yet, will register token after login")
            // Store token for later registration
            let hexString = deviceToken.map { String(format: "%02.2hhx", $0) }.joined()
            UserDefaults.standard.set(hexString, forKey: "pendingAPNsToken")
        }
    }

    // MARK: - APNs Registration Failure
    func application(_ application: UIApplication, didFailToRegisterForRemoteNotificationsWithError error: Error) {
        print("Failed to register for APNs: \(error.localizedDescription)")
    }
}
5. Testing checklist
- Install on a device; grant notification permission. Verify APNs device token logs.
- Log in, then confirm both device + VoIP tokens register with CometChat (success callbacks).
- Send a message from another user:
- Foreground: ensure
willPresentshows your chosen presentation. - Background/terminated: tapping opens the correct conversation.
- Foreground: ensure
- Trigger an incoming call; CallKit UI should show caller info. Accept should join the call; Decline should reject via CometChat and end CallKit.
- Rotate tokens (reinstall or toggle VoIP) to ensure re-registration works.
6. Troubleshooting
| Symptom | Quick checks |
|---|---|
| No pushes | Entitlements set, APNs provider creds correct, bundle ID matches dashboard, permission granted. |
| Token registration fails | Run after login; provider IDs correct for device vs VoIP. |
| Taps do nothing | Verify notification center delegate and navigation readiness before routing. |
| Call UI missing | Ensure PushKit delegate fires, CallKit capabilities enabled, VoIP provider ID set. |
| Audio errors | Configure AVAudioSession for playAndRecord when reporting/accepting calls. |